While wandering around Walmart a couple of weeks ago I found this cute little planner:

I purchased this to jot down daily happenings for my Project Life album. I love it, it's a 1/2 size (5.5" x 8.5") planner & it's just plain cute! Each monthly divider tab has a quote on it, which is perfect for PL. The journal/week on 2 pages has just enough room for me to jot down a few sentences - memory joggers, if you will. I just love it!
I've always loved repurposing old binders. I've done the Household Binder (which is what this is going to be, the new version), I have a Bill Binder (thinking I might make a new one), etc... So finding this binder definitely sparked my creativity! I made the mistake of searching for something binder related on YouTube & stumbled upon the Filofax craze! After watching many, many, many videos, I decided that I wanted to make myself a binder for 2014... the perfect binder (for me anyway). The Filofax name doesn't do anything for me, but having a cute, usable binder does! So off to my craft room I went...
I have a ton of 3-ring binders that I've hoarded for moments like this. (IMO, you can never have too many binders, of all shapes & sizes!) So, I started digging through my room & finally found this:

I bought this (very expensive) system several years ago, so I have 4 of these, fully loaded, & one that's (still) waiting to have it's pages put in. :/ But, I found one a few months ago at Goodwill & bought it, not having a clue what I'd do with it, but again, you can never have too many binders! :)
After studying the size & pondering all of the possibilities, I decided to cut it down & make a binder that would accept 1/2 size pages, or 5.5" x 8.5". The exact measurements of the binder itself I'm not sure of at this moment, but the 1/2 pages fit perfectly. Plus, this binder has 3" rings! I don't know about you, but I like fat binders! :) I want to have ample room for as many pages, pockets, dividers, etc. as I want. I think this one will handle that task easily. Here are the pieces cut from the front & back:

Now to decorating! I've had a few rolls of Duck Tape brand designer tape for a long time that I had no clue what to do with... Hmmm, are you thinking what I'm thinking?


I couldn't decide if I wanted to use the butterflies or the polka dots, so I used both. (I've since really fell in love with the polka dots & the colors, so I *think* I'm going to cover the whole thing in polka dots & get a solid color to use as the "binding". Yes, I can smell a shopping trip in my near future.) I taped only the outside of the binder, I didn't wrap the tape inside, & cut it even with a box knife. Then, I used my Zutter brand corner rounder to round the corners. I have yet to do anything with the inside of the binder, but I have an idea that I'll share... If I ever get around to it.
To the inside!

First we have a "dashboard". I made this out of stencil plastic & then put washi tape along the side & punched holes. This will hold post-it notes & tags & flags.

This is probably my favorite-ist part so far! I made these using my beloved Silhouette Cameo. This is a file available in the Silhouette Online Store. It's actually supposed to be a folder, but with the magic of the Silhouette Design Studio, I cut off one side, resized it, & voila, binder dividers! I think these are just the cutest things! I used a heavy cardstock, I believe it was the Colorbök brand from Walmart. The colors aren't perfect in these pics, but I made one pink, one purple & one green, with orange tabs.
I already loved my Cameo, but this just made me fall in love all over again! I have many more things like this to cut out especially for my binder & it just makes it so easy! There are tons of this type of file on the Online Store, also. :)
Here's a close up of the tabs:

BTW, the font I used is A Gentle Touch. I used small, clear Avery return address labels to print the tab titles on.
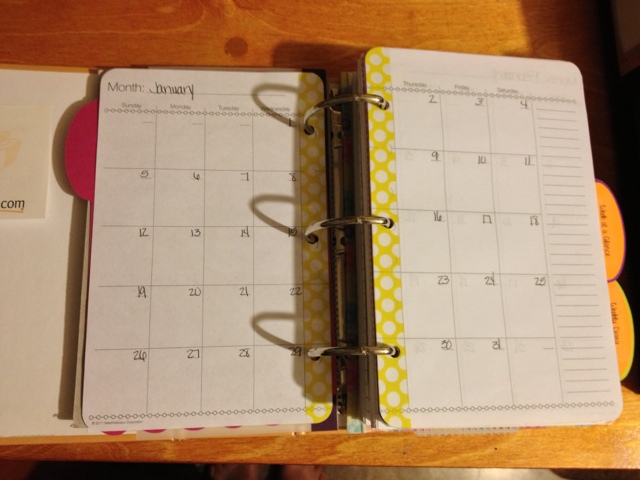
Behind my Monthly Calendar tab I put the month on 2 pages calendars, Jan - Dec, printed front & back. I found an old planner I had previously used that had some blank pages, so I scanned them & laid them out in Photoshop. When they were all printed out, I added washi tape to the sides of the pages. This is where the holes were punched, which showed up when I scanned the sheets; the washi covered this up & acts as a reinforcer. (Each month has a different color/pattern of washi.) Then I wrote in the months & days...
Then, I made some custom Week At A Glance pages (they're actually weekly to-do pages, but whatever). I searched everywhere & couldn't find the perfect weekly page for me, so I made my own. This is where I'll write out things that need to be done/remembered for each week. All I did was take some fine tipped Sharpie markers & draw out boxes. Then, I scanned my drawings & opened them up in Photoshop. I then labeled the page & each box, again using A Gentle Touch font. I printed them out on some 5.5" x 8.5" lined filler paper (I like this notebook look), front & back. This wasn't hard, but tedious. I had to babysit my printer as 26 of these printed out, then again for the other 26 (back side), because my printer wasn't too fond of this paper, it was kind of thin.

The boxes are labeled, L to R: Goals, Communications, To Do's, Random Thoughts, Don't Forget & Next Week.
I think this page is going to be perfect, but if not, I saved the .psd file, so I can always go back & change it. :)
*Tangent: While watching all of the Filofax/planner videos on YT, I kept seeing the nifty little magnetic paper clips/bookmarks. I looked them up on Amazon, but I think they're a little pricey, so I made my own:

I know, this doesn't even resemble the clips you can buy... It's cuter! :)
I had a long magnet (why, I have no clue) that I just folded in half, adhered some ribbon to & attached a gromlet (I think it's called) from WeR. It can hold several pages, but it's not super strong. I've found some super magnets on Amazon that I'm going to order & make some more.
*End of tangent.
Next up are the Weekly Diary pages. I copied this layout from my little planner from Walmart. I love having a little place to write stuff down, but I don't need a whole journal.
For these, I used the same boxes from my Week At A Glance pages. I just moved them around & resized them in PS. I printed these on Epson presentation paper (hopefully there'll be no ink bleed through), front & back. Cut them in half, hole punched them & rounded the outer corners.

*These actually looked better printed non borderless, but it made the boxes way smaller, so I printed borderless. Personal preference I guess.
Here is a bookmark I made out of that plastic cross stitch stuff. I cut it down, used my pink tiger striped Duck Tape on the edge & hole punched it. I actually meant for it to stick up at the top & be even with the other pages on the bottom, but I messed it up. :( I have more of this stuff though, so I can always make another one!
There's no specific reason that I used the cross stitch plastic, it was just laying there so I used it. :)

Next are my grungy page pockets. These came out of some junk that my Mom had. I kept them, not knowing what to do with them, but knowing I'd use them someday. They're smaller than the filler pages, but big enough to fit in all 3 rings. They were previously punched with like 20 holes, so I covered those with washi tape & repunched them. As you can see, they're really discolored. There's no telling how old these things are! I tried wiping them down, but I think the grunginess is there to stay. If anyone has any ideas to brighten these babies up, please feel free to share! They're the rubbery feeling plastic, BTW.
Right now this first one is holding all of the printer settings I've used for my previous pages.

Next there is paper. I had some lined filler paper that is in front of this, but didn't feel the need to take a picture of it. The paper in the picture is printer paper bought at the dollar store (Dollar Tree). There are many different designs, only 2 pictured. I just cut this paper right down the center & hole punched. I will probably round the corners of this too.

Love this flower paper!

Here are my pockets I made. I simply took a piece of 12" x 12" cardstock, scored it vertically in the middle, then horizontally 4" from the bottom. I folded up the 4" piece, then folded the whole sheet in half so the pockets are on the outside. I taped the pockets with clear Scotch tape, hole punched the open side & rounded the upper corners.


I made 4 of these, so there are actually 8 pockets. I'm not 100% sure what I'm going to use them for, but I'm sure I'll figure out something. The paper is from a Martha Stewart pad I got at Walmart a long time ago.
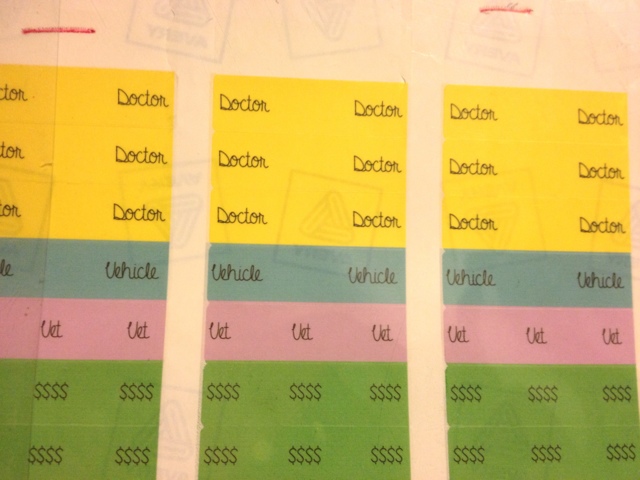
Here, I copied this idea from the Erin Condren planners. I made some calendar stickers using Avery labels. These are clear & very small, there are 80 labels to a sheet. I just opened up the template in Microsoft Word, filled in the cells with different colors & added text, again using A Gentle Touch font. These will have to be cut in half, or thirds, as I use them; one label would've been too big for a calendar square. I made up several with generic tasks/events, then I made some with mine & my hubby's names, for events specific to each of us.
These labels are stored in a clear page protector. The protector is actually large enough to hold a magazine. (I used to work for a magazine company & apparently some of these followed me home... Don't judge.) Anyhoo, I just folded them in half & washi taped the side & hole punched. They're great because the side (after folded it becomes the top) has a little flap to keep things from falling out, kind of like the Martha Stewart protectors. If you look in the picture above, you can kind of see the flap on the left hand side.
Here is what my binder looks like all laid out. Look how big those rings are! I also love that the rings are actually attached to the back cover, rather than the middle of the binder, so the front cover can be folded back & not take up so much desk/table space.

Here is a before & after look at the binders:

And that's it! (Whew!)
I have several more ideas for this binder & will definitely post when/if they get done!
I hope you enjoyed this & if you have any questions don't be afraid to ask!
No comments:
Post a Comment